¶ Maze lesson 3: finding sprites
In case you have any remarks or questions on these tutorials they are always welcome, preferably via the slack channel wiki-content-feedback. (You can notify the education committee specifically by adding @educo to your message.) You may also send us an email at education@serpentineai.nl.
¶ Intro
In this lesson we are going to talk about the following
- How to find the location of the player and cheese.
- How to use template matching
- How to use color matching
¶ Sprite locations
Inside the game of Maze we are searching for the player and cheese location. Because we want to create a path between these two sprites. For a human it is easy to locate the objects based on the image, however for a computer this is slightly more complicated.
In the previous lesson we already extracted the maze and are still left with locating the sprites. There are several ways to locate an object in an image, using algorithms or machine learning models. An example of a machine learning model is YOLO3, and an example of an algorithm is template matching.
In this tutorial we will focus on the non machine learning solutions. The reason for this is that a machine learning model requires examples (labeled data), which we currently do not have. The following sections will take a look at Template Matching (TM) and Multi Template Matching (MTM).
¶ Template Matching
From opencv documentation
Template Matching (TM) is a method for searching and finding the location of a template image in a larger image. OpenCV comes with a function `cv.matchTemplate()` for this purpose. It simply slides the template image over the input image (as in 2D convolution) and compares the template and patch of input image under the template image. Several comparison methods are implemented in OpenCV. (You can check docs for more details). It returns a grayscale image, where each pixel denotes how much does the neighbourhood of that pixel match with template. [[1][tm-description]]
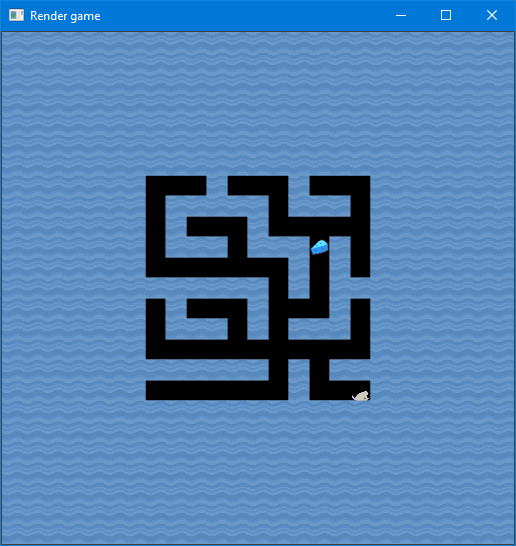
So in order to perform this we need some template images. You can save the following images as player.png and cheese.png, by right clicking them and press Save Image As....


Try and locate the above sprites on the following image (save as tm-test.png, if you want to compare the solutions).
Tip: Take a look at cv2.rectangle, to see how to draw a rectangle around a matching point.
Assume we have a folder templates, with the files tm-test.png, player.png and cheese.png, at the same level as the following code in a file:
import cv2


def extract_sprite(image, template):
    result = cv2.matchTemplate(image, template, cv2.TM_CCOEFF)
    height, width = template.shape[:2]
    min_val, max_val, min_loc, (tl_x, tl_y) = cv2.minMaxLoc(result)
    cv2.rectangle(image, (tl_x, tl_y), (tl_x + width, tl_y + height), (255, 0, 0), 2)
    return image


if __name__ == '__main__':
    image = cv2.imread('images/tm-test.png')
    template_cheese = cv2.imread('templates/cheese.png')
    template_player = cv2.imread('templates/player.png')

    # This modifies 'image' in place, if you don't want this use 'image.copy()'.
    extract_sprite(image, template_cheese)
    extract_sprite(image, template_player)

    cv2.imshow('Result', image)
    cv2.waitKey(delay=0)
Which results in
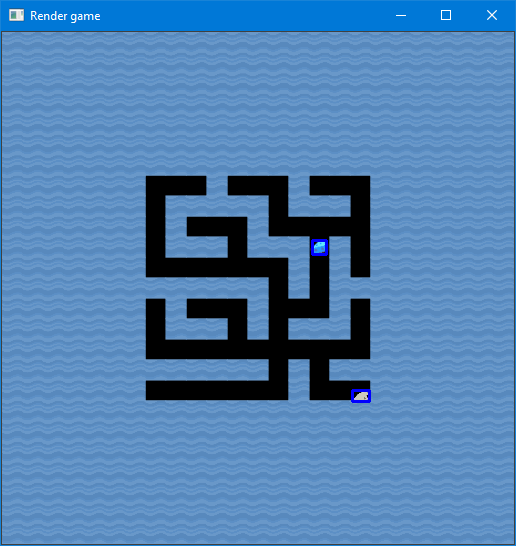
In order to implement the template matching in the agent, we have to load the templates (preferably once) and create a bounding box around the objects. Later on we will need the actual coordinates of the center, but for now coloring it on the image is good enough.
Only the changed methods are shown
class Agent:
    def __init__(self, venv: procgen.ProcgenEnv):
        self.action_space = venv.action_space.n
        self.templates = dict(
                goal=self.load_template('cheese.png'),
                player=self.load_template('player.png'),
        )

    def load_template(self, filename: str) -> np.ndarray:
        """ Load a template from the 'templates' folder.  """
        filepath = os.path.join(os.path.dirname(__file__), '..', 'templates', filename)
        return cv2.imread(filepath)

    def compute_action(self, observation: np.ndarray) -> np.ndarray:
        """ Calculate the best action for the agent.  """
        maze, scale = self.extract_maze(observation, grid_size=(25, 25))
        self.extract_sprite(observation, template=self.templates['goal'])
        self.extract_sprite(observation, template=self.templates['player'])
        return np.random.randint(0, self.action_space, 1)

    def extract_sprite(self, image: np.ndarray, template: np.ndarray) -> np.ndarray:
        """ Extracts the templates position from the input image, and returns their center location.  """
        result = cv2.matchTemplate(image, template, cv2.TM_CCOEFF_NORMED)

        height, width = template.shape[:2]
        min_val, max_val, min_loc, (tl_x, tl_y) = cv2.minMaxLoc(result)
        cv2.rectangle(image, (tl_x, tl_y), (tl_x + width, tl_y + height), (255, 0, 0), 2)
        return image
Note 1: The filepath in load_template is assuming that the folder core and templates are at the same level. If you remove the '..', it is assumed that the templates folder is inside the core folder.
Note 2: The templates key names are goal and player for the reason of future compatibility. Later on we will reuse the name goal with a different template image for the game heist. If you named it cheese, this is no problem.
Note 3: At this moment we are not doing anything with the results, but only checking how it is working.
¶ Template Matching (part 2)
Before reading on, make sure that the above agent code is working and that you have seen how it sometimes wrongly detects the player position.
As can be seen while running the code, you will notice that the template match is not always found correctly. This usually occurrs when the player is facing left, instead of right as in the template. Now in order to handle this correctly, we can take multiple templates of the player looking at the left and right and then check which one is more likely.
Fortunately this is already implemented for us in a package called Multi Template Matching, which is already installed when using pipenv install multi-template-matching in the preparations. To get a better idea of how it works, take a look at the examples in their repository (links below). With those examples, implement a version that allows to match multiple mouse objects, mouses facing left or right.
Tips:
- Since only need to get the left and right facing mouse, you can reuse the above template and use np.fliplr to mirror the image to be left facing instead.
- You can control the numbers of objects that you want to match by using
N_objects, how many matches (objects) do we want? - You can control the overlap between images, using
maxOverlap, how much overlap is there between the cheese and mouse?
¶ Code
from MTM import matchTemplates, drawBoxesOnRGB


class Agent:
    def __init__(self, venv: procgen.ProcgenEnv):
        self.action_space = venv.action_space.n
        self.templates = dict(
                cheese=self.load_template('cheese.png'),
                player_right=self.load_template('player.png'),
                player_left=np.fliplr(self.load_template('player.png'))
        )

    def compute_action(self, observation: np.ndarray) -> np.ndarray:
        """ Calculate the best action for the agent.  """
        maze, scale = self.extract_maze(observation, grid_size=(25, 25))
        self.extract_sprites(observation)
        return np.random.randint(0, self.action_space, 1)

    def extract_sprites(self, image: np.ndarray):
        """ Extracts the templates position from the input image.  """
        hits = matchTemplates(self.templates.items(), image, N_object=2, maxOverlap=0.)
        image[:] = drawBoxesOnRGB(image, hits, showLabel=True)
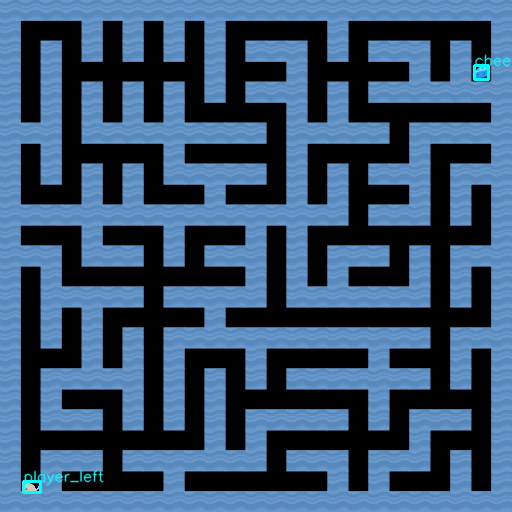
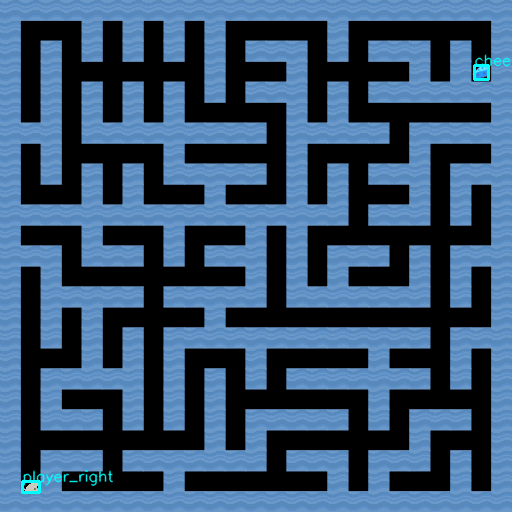
¶ Results
Note that it correctly detects the objects when looking to the left or to the right.
¶ xy-locations
When using the MTM, you will get a pandas.DataFrame, which has the following information
| index | TemplateName | BBox | Score |
|---|---|---|---|
| 9 | player_left | (186, 317, 17, 11) | 0.909079 |
| 0 | goal | (270, 290, 14, 14) | 0.903986 |
The BBox values describe a rectangle around the particular template. The given BBox consist of respectively the x and y value (of the left top corner), followed by the height and width of the bounding box. These values can be used to calculate the center of each bounding box, which is going to be useful for creating a path in the next lessons.
The variables sprite_left and sprite_right are not really relevant by themselves. Instead, they are useful to find out the exact location of the player. This means that the final template names are only going to be goal and player with their x and y center location.
Tips:
- Each column can be obtained using
hits[header], or every row by looping over hits.to_numpy(). - We are going to work on a downscaled versions of the maze, hence we also need to scale down the x and y location of the sprite centers.
Line 8 is optional. It simply shows the bounding box that you have created on the observation image.
    def compute_action(self, observation: np.ndarray) -> np.ndarray:
        """ Calculate the best action for the agent.  """
        maze, scale = self.extract_maze(observation, grid_size=(25, 25))
        sprites = self.extract_sprites(observation, scale)
        return np.random.randint(0, self.action_space, 1)

    def extract_sprites(self, image: np.ndarray, scale: float) -> Dict[str, Point]:
        """ Extracts the templates position from the input image, and returns their center location.  """
        hits = matchTemplates(self.templates.items(), image, N_object=2, maxOverlap=0.)
        image[:] = drawBoxesOnRGB(image, hits, showLabel=True)

        centers = {}
        for template, (x, y, w, h), score in hits.to_numpy():
            centers[template.split('_')[0]] = int((x + w / 2) / scale), int((y + h / 2) / scale)
        return centers
In order to complete the type hinting (the -> Dict[str, Point]) you also have to add the following lines att the start of the file
from typing import Tuple, Dict

...

from MTM import matchTemplates, drawBoxesOnRGB

# A type alias, which assigs Tuple[int, int] to the alias Point.
Point = Tuple[int, int]
¶ Summary
In this lesson we have taken a look at how we can locate sprites on an image using a template image and how it can be improved using the Multi Template Matching packaging.
Now that we have a good binary image of the maze and can realiably locate the sprites in the image, it is time to create a path between the mouse and the cheese!